rancher aws ansible deployment
2017-03-16 UPDATE - this is an old, unmanaged project. Use as a reference only. Mostly using Kubernetes now.
Using Rancher, a container management platform, to deploy a dockerized ELK stack to AWS using Ansible.
Background
In certain scenarios, deploying Docker containers to infrastructure can be trickier than expected. Take an Elasticsearch, Logstash, Kibana (ELK) stack. Three docker containers, straight forward. Running a simple docker compose and our stack can be up without issue.
The problem arises when the systems are distributed; when you have multiple hosts running individual Docker containers.
- How do you connect Docker containers on different hosts?
- If other hosts can run the Docker containers, how do you ensure persistent data is accessible from every host? What is containerA runs on host1, but later it is run on host2? How can that same data be available to ALL hosts?
- How do you publish services for other hosts outside of the Docker network? How do I know what host is running Elasticsearch and what host is running Kibana?
There are plenty more. But the core issue is, why worry about where the container is running? Why not just throw a bunch of settings (docker-compose.yml) at something and let the orchestration happen? It’s a similar thought to VMs; there is no need to know about the underlying hardware. Docker containers can be the same. Why do we need to know about the underlying OS/system/network? How do we abstract away this level?
A tool is needed; and there are a couple of them:
- Docker Swarm
- Apache Mesos - although to be fair this is more of a clustering tool rather than a Docker container tool.
- Amazon ECS - good ol' Amazon
- Google Kubernetes
There are others, to be sure. But the title of this post doesn’t include “Kubernetes” or “Swarm”. This is about Rancher.
Rancher is a “container management platform” and has some pretty cool features. Health checks, cross-host networking, load balancing, service discovery, a distributed file system, a lot of AWS integration, multiple cloud vendor support… Some cool stuff. I’ve been impressed with what I’ve seen considering it’s a 1.0 release. Shout out to that team, well done.
And that gets to what we’re doing here. This post walks through deploying (using Ansible) an AWS infrastructure, AWS instances, Rancher, various Rancher system stacks, a Docker ELK stack, topbeat, and finally AWS ELB.
A couple things worth noting. Rancher has a couple interesting built-in Docker stacks - Convoy/GlusterFS and a route53 stack. These two Rancher stack systems are provided with Rancher within it’s catalog, a collection of pre-configured Docker stacks. It’s a few mouse clicks away. With Convoy, we have a distributed filesystem for persistent storage and volume mounts available on EVERY host that a Docker container could run on. Convoy leverages the distributed filesystem, Glustefs to provide Docker volume mounts on all hosts. Route53 is a service that can publish DNS entries for every container that has a port exposed. Very handy. More cataloged stacks can be found here: https://github.com/rancher/rancher-catalog
Some cool features worth investigating. Time to automate. FYI, I’ve been working with Rancher for… 9 days. There’s a lot left to discover and there’s plenty to improve.
the stuffs - preamble
- The usual preamble. I build my playbooks as modular as possible; I wrap up everything, AWS secret and access keys included, into a vault file. This way I have one password file or password to protect. Makes it very modular.
- I’m currently using Ansible 2.0.0.2. I’d go to 2.0.1.0, but there’s a nasty little bug with AWS subnets right now.
- There’s also one minor catch: I have pre-baked AMIs for various roles. This allows the SSH fingerprint to be known ahead of time. I can then either accept that each system has the same host keys (kinda bad) OR regenerate SSH keys at the time of configuration.
- In this playbook, I’ve also created an additional user with the following policy:
{
    "Version": "2012-10-17",
    "Statement": [
        {
            "Effect": "Allow",
            "Action": [
                "route53:CreateHostedZone",
                "route53:List*",
                "route53domains:*",
                "route53:ChangeResourceRecordSets"
            ],
            "Resource": [
                "*"
            ]
        }
    ]
}
This user will be used by the Rancher system stack route53, which will maintain the internal DNS network. More on that later.
- A customized Ansible module -
ec2_vpc_route_table.py. This is to work around an issue with a black hole route (if your NAT instance is terminated and recreated). - There’s another customized Ansible module -
ec2_elb_lb_devel.py. This is to support web sockets - https://github.com/ansible/ansible-modules-core/blob/devel/cloud/amazon/ec2_elb_lb.py Hopefully this is pushed out soon.
playbook overview
Here’s a quick overview of the steps to deploy Rancher:
- Configure AWS infrastructure - VPC, subnets, IAM, NAT instance, routes, security groups, instances, and Route53.
- Import the NAT ssh fingerprint and configure Ansible groups.
- Create Ansible groups.
- Gather SSH fingerprints in the VPC for internal hosts and import them to the localhost system.
- Configure all instances (update, install Docker).
- Install Rancher server.
- Configure Rancher server.
- Start the Rancher agent Docker container on all Rancher hosts.
- Wait for hosts to connect to the Rancher server.
- Deploy GlusterFS and Convoy stacks.
- Create the Docker container volume-builder and import files and configurations to the Convoy volume.
- One one of the Rancher hosts, run a temporary volume-builder Docker container to import the data.
- Deploy the Rancher docker-elk stack.
- Deploy the Rancher route53 stack.
- Find the elasticsearch service.
- Add that host to an Ansible group.
- Configure Elasticsearch, including beats templates, Kibana indexes, and default indexes.
- Install beats on all instances (in this case, only topbeat).
- Configure the Rancher ELB.
- Configure the ELK ELB.
Ha, quick. Let’s hit the important parts.
rancher - start server and configure server
Instances have been created and an initial configuation applied. Time to install and configure Rancher server. The Rancher server startup is simple:
- name: Run Rancher Server
  docker:
    image: "rancher/server"
    name: "rancher_server"
    ports: "8080:8080"
    state: started
  register: rancher_start_facts
A simple docker run -d -t --ports 8080:8080 rancher/server.
One of the first things done to configure is creating and environment API token. This token is used for authentication for all actions performed against the Rancher server. This is done using the REST API (if the credentials file doesn’t exist):
- name: Create environment API token if credentials file doesn't exist.
  uri:
    url: "http://localhost:8080/v1/projects/1a5/apikeys"
    method: POST
    status_code: 201
  when: rancher_credentials_stat_fact.stat.exists == False
  register: environment_api_fact

- name: Create Rancher credentials file.
  template:
    src: ./files/rancher/.rancher_credentials.j2
    dest: "/root/.rancher_credentials"
    owner: "root"
    group: "root"
    mode: "0640"
  when: rancher_credentials_stat_fact.stat.exists == False
The token is two keys in the format FIRSTONE:SECONDONE. An Ansible fact is created with this token for later use. The next step is to enable local authentication (if the credentials file doesn’t exist):
- name: Enable localAuth on Rancher.
  shell: "curl -X POST -H 'Content-Type: application/json' http://localhost:8080/v1/localAuthConfig -d {{ vault_vars.rancher.localAuthConfig }} "
  register: enable_localauth_fact
  when: rancher_credentials_stat_fact.stat.exists == False
Local authentication enabled. The vault_vars.rancher.localAuthConfig will have the following format:
'{"type":"localAuthConfig","accessMode":"unrestricted","enabled":true,"name":"admin","username":"admin","password":"YOURSECRETPASSWORD"}'
Stored in your vault. From here on out, the environment API token will be required.
Next we check for the existence of registration tokens. These tokens allow hosts to register with the Rancher server. Check, create if necessary, get the newly created token, and set the fact:
- name: Check for number of tokens.
  shell: curl -s -u {{ environment_api_token_fact }} -X GET http://localhost:8080/v1/projects/1a5/registrationtoken|python -m json.tool |grep token|grep -v localhost| awk -F'"' '{print $4}'|wc -l
  register: number_of_tokens_facts

- name: Create new token.
  shell: curl -s -u {{ environment_api_token_fact }} -X POST http://localhost:8080/v1/projects/1a5/registrationtoken
  when: number_of_tokens_facts.stdout|int == 0

- name: Get token
  shell: curl -s -u {{ environment_api_token_fact }} -X GET http://localhost:8080/v1/projects/1a5/registrationtoken|grep token| python -m json.tool |grep token|grep -v localhost| awk -F'"' '{print $4}'
  register: registration_token_facts

- name: Set token fact.
  set_fact:
    registration_token_fact: "{{ registration_token_facts.stdout }}"

- name: Create Rancher registration token.
  template:
    src: ./files/rancher/.rancher_registration_token.j2
    dest: "/root/.rancher_registration_token"
    owner: "root"
    group: "root"
    mode: "0640"
Now local authentication is enabled, environment API tokens have been created for REST API interactions, and host registration tokens have been established.
rancherhost - start rancher agents
Based on the Role tag, Ansible groups have been created and one of those is rancherhost. Using the rancher_private_ip_fact_vars and registration_token_fact_vars variables, Rancher agents are launched on each AWS instance within the rancherhost Ansible group:
- name: Run Rancher Host agent.
  docker:
    command: "http://{{ rancher_private_ip_fact_vars }}:8080/v1/scripts/{{ registration_token_fact_vars }}"
    image: "rancher/agent"
    state: started
    volumes:
    - '/var/run/docker.sock:/var/run/docker.sock'
    - '/var/lib/rancher:/var/lib/rancher'
One thing to note, do NOT use name: rancher-agent. This will cause the Rancher agent startup to fail (it uses that name for the agent).
rancher - wait for hostvars
I wanted to include this to show another interaction with the Rancher REST API. Basically we’re just checking for a transition state:
- name: Wait for Rancher hosts to start up .
  shell: curl -s -u {{ environment_api_token_fact }} GET http://localhost:8080/v1/projects/1a5/hosts|python -m json.tool|grep {{ item.split('.')[0] }} | awk '{print $2 }'
  register: wait_rancherhosts
  with_items: groups['rancherhost']
  until: wait_rancherhosts.stdout.find(item.split('.')[0]) != -1
  delay: 5
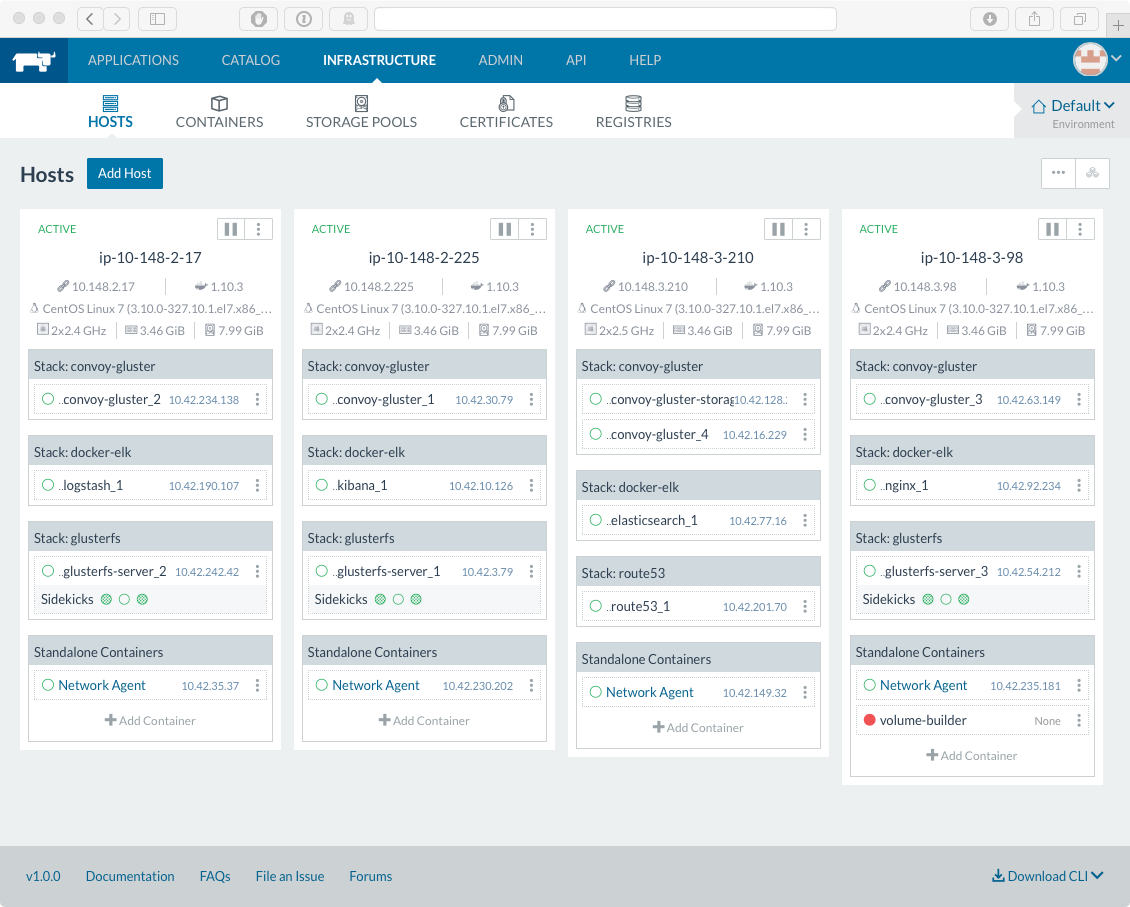
I thought this was a cool step. Just waiting for the Rancher server to report all hosts have shown up, using the REST API. When they’re all up, the GUI will look like so:
rancher - convoy deployment
Convoy looks like it has some interesting potential. The really killer use is that regardless of what host the Docker container starts up on, The volume mount will be there. That’s pretty awesome. It also allows centralized logging. If all hosts log to a Convoy volume mount, Then another Docker container, say filebeat, can run as a Docker container with access to all of the volumes (most likely, read-only mode). filebeat runs as a Docker container and sends log data to our ELK stack. Boom. Easy log aggregation and analysis.
The GlusterFS stack and wait:
- name: Start the glusterfs stack.
  shell: " curl -s -u {{ environment_api_token_fact }} -X POST -H 'Content-Type: application/json' http://127.0.0.1:8080/v1/projects/1a5/environments -d '{{ rancher_vars.glusterfs }}'"

- name: Wait for glusterfs stack to be created.
  shell: curl -s -u {{ environment_api_token_fact }} -X GET http://localhost:8080/v1/projects/1a5/environments/1e1|python -m json.tool|grep transitioning|head -n1
  register: wait_gluster_stack
  until: wait_gluster_stack.stdout.find('no') != -1
  delay: 15
  retries: 40
The rancher_vars.glusterfs variable can be found in host_vars/127.0.0.1/demo_aws_internal_rancher.yml. So how did I get construct this variable? Rancher provides this awesome functionality. ALL Rancher web GUI actions can be translated to API functions. It even provides a handy way of seeing the API. From the web interface, select ADMIN and then AUDIT LOG. You’ll see commands run. By clicking on the “i” next to the event, we can see the API call.
So once we manually deploy the GlusterFS stack from the CATALOG menu item, we can see the API:
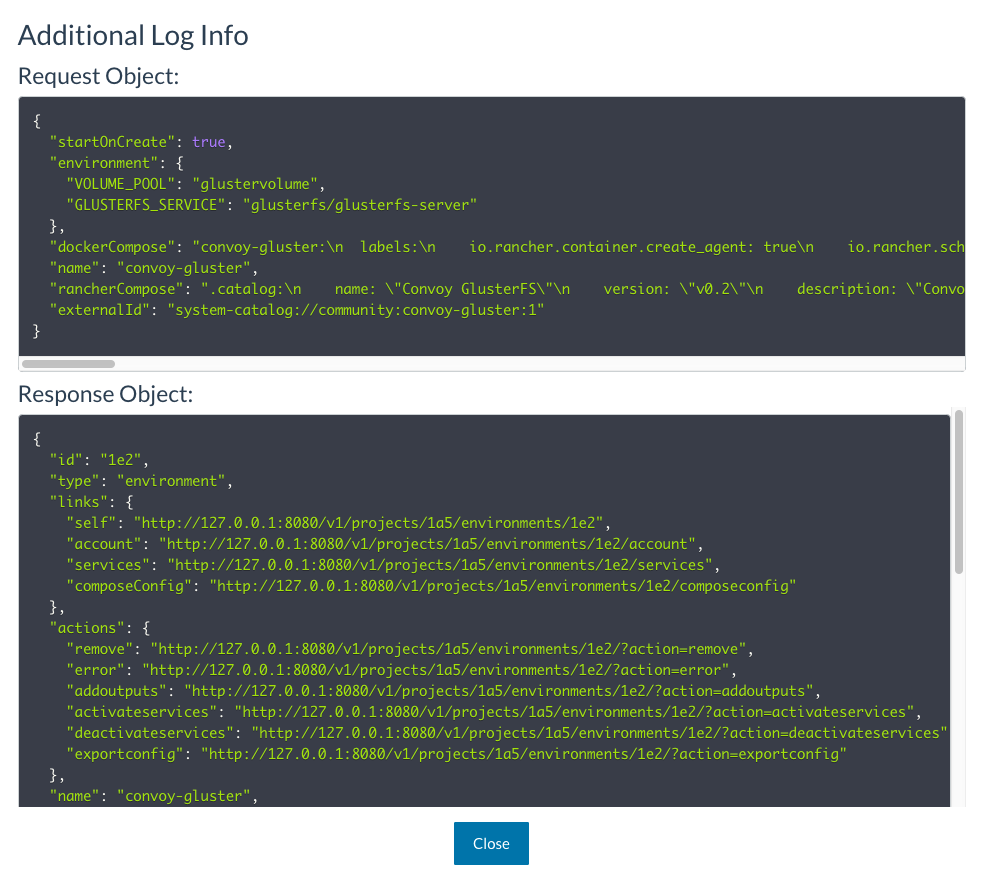
Pretty cool. After that we do the same for Convoy:
- name: Start the convoy-gluster stack.
  shell: " curl -s -u {{ environment_api_token_fact }} -X POST -H 'Content-Type: application/json' http://127.0.0.1:8080/v1/projects/1a5/environments -d '{{ rancher_vars.convoy_gluster }}'"

- name: Wait for convoy-gluster stack to be created.
  shell: curl -s -u {{ environment_api_token_fact }} -X GET http://localhost:8080/v1/projects/1a5/environments/1e2|python -m json.tool|grep transitioning|head -n1
  register: wait_convoy_stack
  until: wait_convoy_stack.stdout.find('no') != -1
  delay: 15
  retries: 40
Finally, we do a quick check to see if the volumes have been created. If they haven’t, create them:
- name: Check if volumes have been created.
  shell: "curl -s -u {{ environment_api_token_fact }} -X GET -H 'Content-Type: application/json' http://localhost:8080/v1/projects/1a5/volumes | awk /{{ rancher_vars.volumes.0.name }}/"
  register: volume_check_fact

- name: Create convoy volumes.
  shell: "curl -s -u {{ environment_api_token_fact }} -X POST -H 'Content-Type: application/json' http://localhost:8080/v1/projects/1a5/volumes -d '{\"driverOpts\":{},\"description\":\"{{ item.description }}\",\"name\":\"{{ item.name }}\",\"driver\":\"convoy-gluster\",\"isHostPath\":false}'"
  with_items: rancher_vars.volumes
  when: volume_check_fact.stdout.find('name') == -1
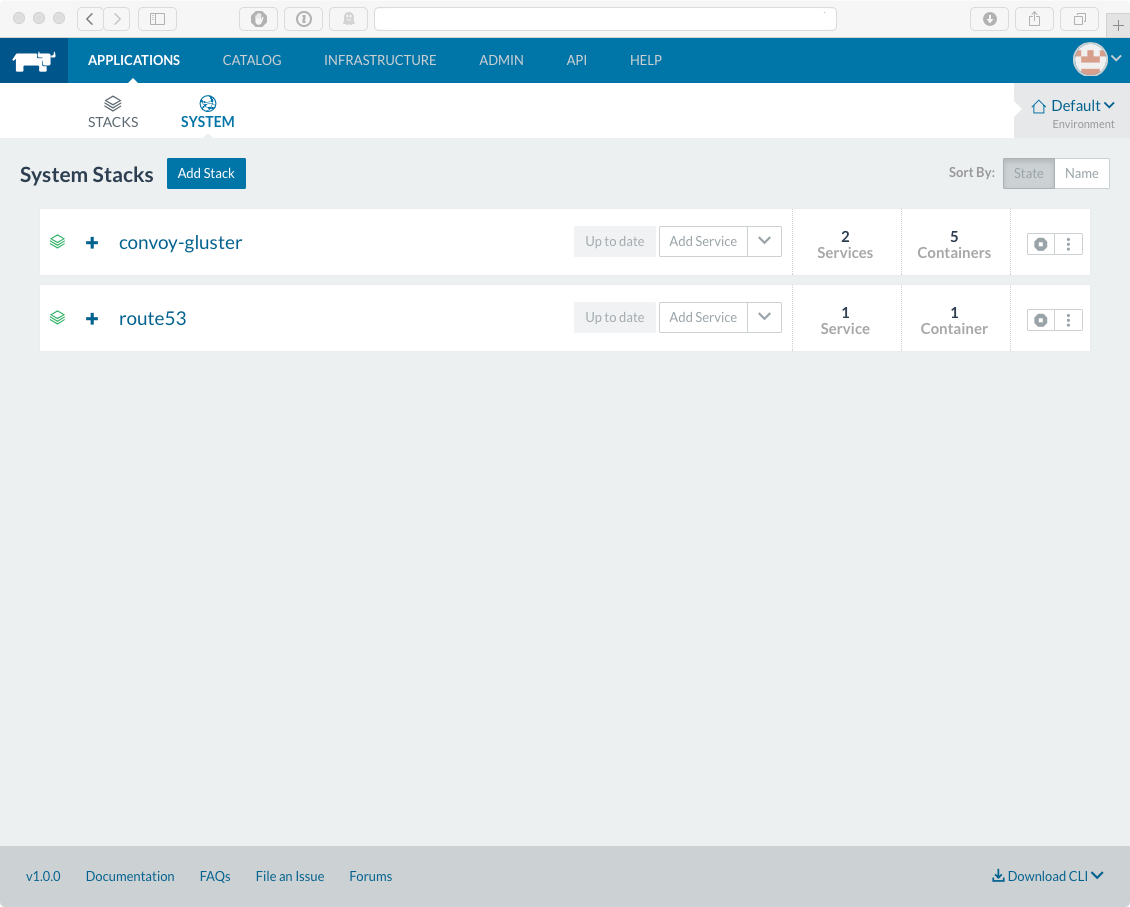
Distributed filesystem created. One really awesome thing to note, all new Rancher hosts after this get a convoy-gluster docker container. Nice trick.
rancherhost[0] - create volume data
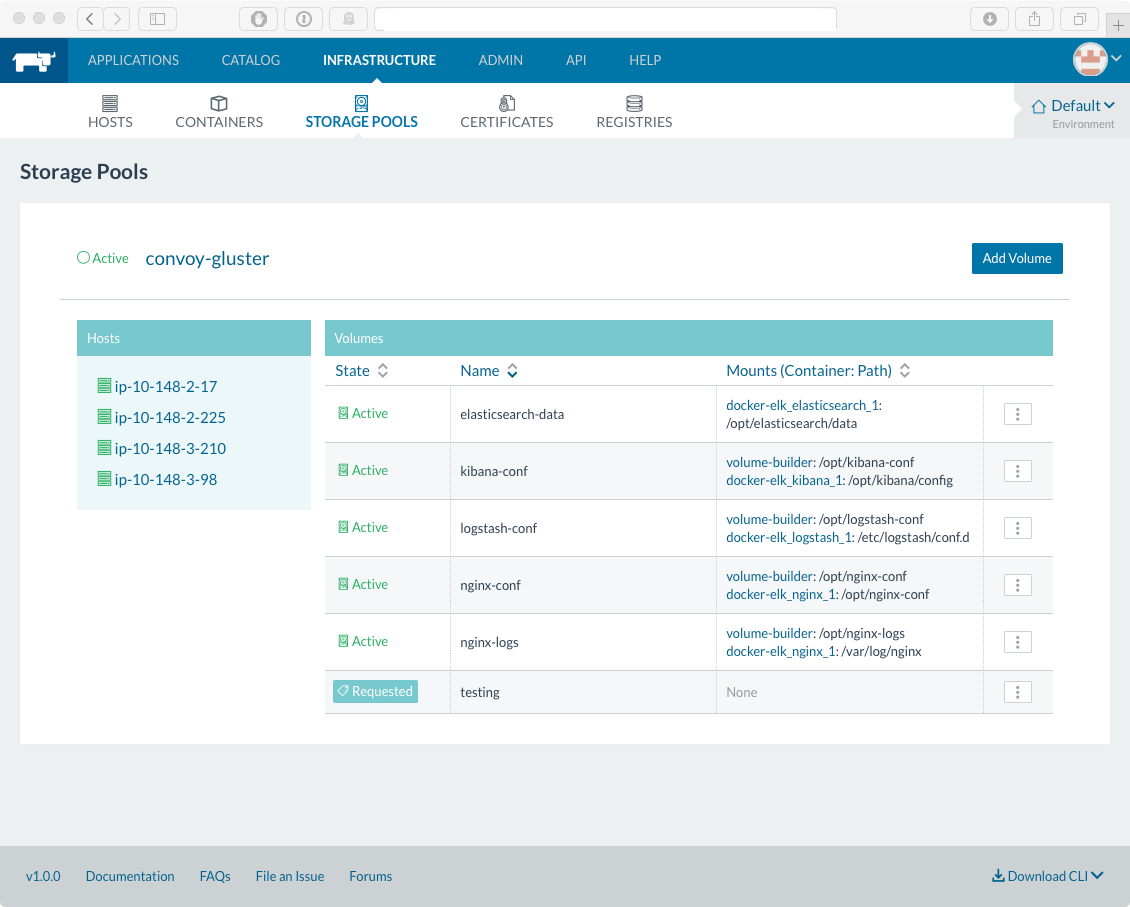
Having a docker based distributed file system is great and all but… How does data even get on this thing? There are convoy command-line tools. You can also create a Docker instance that has a sole purpose to get data on there. That’s the way I went. Ansible copies the files to the system, verifies volume-builder hasn’t already run, then builds and runs the volume-builder docker container. Once finished, Rancher’s Storage System will be populated:
rancher - deploy stacks
I used rancher-compose to first deploy the stack to Rancher. Here’s the original docker-compose.yml and rancher-compose.yml files. After that, lookup the API format from ADMIN/AUDIT LOG.
Route53 was a catalog provided container. Straightfoward, similar to GlusterFS and Convoy. This variable is stored in vault, as it contains AWS credentials.
find elasticsearch docker container
Data sources in Elasticsearch require templates in order to properly organize and parse the data. So we need to get to that host and run a few curl commands to import templates and settings. But… which host is the Elasticsearch Docker container running on?
That’s where the route53 system stack helps. It’s busy updating the internal DNS for that stack, in that account. The route53 stack will add DNS entries for all Docker containers that have exposed ports.
And that’s how Elasticsearch is found - using the route53 system stack.
- name: List all hosted zones.
  route53_facts:
    aws_secret_key: "{{ vault_vars.aws_secret_key }}"
    aws_access_key: "{{ vault_vars.aws_access_key }}"
    region: "{{ vault_vars.region }}"
    query: hosted_zone
  register: hosted_zones

- name: List the resource record sets in a given hosted zone.
  route53_facts:
    aws_secret_key: "{{ vault_vars.aws_secret_key }}"
    aws_access_key: "{{ vault_vars.aws_access_key }}"
    region: "{{ vault_vars.region }}"
    query: record_sets
    hosted_zone_id: "{{ hosted_zones.HostedZones|selectattr('Name', 'equalto', ENV + '.')|map(attribute='Id')|list|first }}"
  register: record_sets

- name: Set elasticsearch IP address fact.
  set_fact:
    elasticsearch_ip_fact: "{{ record_sets.ResourceRecordSets|selectattr('Name', 'equalto', 'elasticsearch.docker-elk.default.' + ENV + '.')|map(attribute='ResourceRecords')|list|first|map(attribute='Value')|list|first }}"

- name: Create elasticsearch hostname.
  set_fact:
    elasticsearch_private_dns_fact: "ip-{{ elasticsearch_ip_fact.split('.')[0] }}-{{ elasticsearch_ip_fact.split('.')[1] }}-{{ elasticsearch_ip_fact.split('.')[2] }}-{{ elasticsearch_ip_fact.split('.')[3] }}.us-west-2.compute.internal"
Find all the zones, find all records within the internal zone that was created earlier (the role aws.route53), set the IP address fact, and finally construct the private DNS fact. Add the host to an Ansible group and it can be accessed!
configure elasticsearch
Nothing too crazy here, just worth noting. In order to properly process the beats (topbeat and filebeat) data, the Elasticsearch templates are imported. The default beats dashboards are pretty nice as well and at the very least provide a start for creating custom dashboards. Finally, the default index is configured.
summary
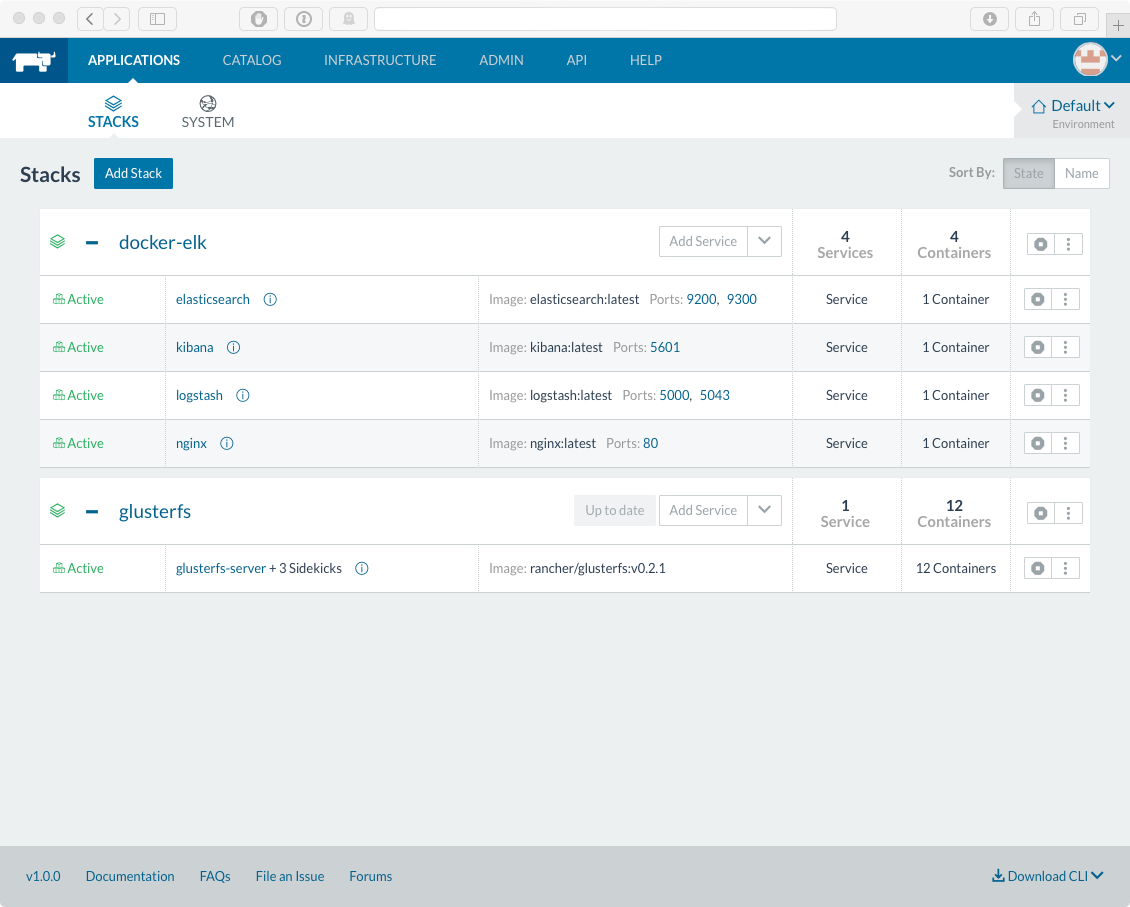
It’s a bit of a beastly playbook, but this is what we end up with:
Links to moar pictures:
Some ways to improve this playbook:
- Host registration tokens expire yearly. Need logic to create new ones.
- Configure ELB with SSL (many of the lines are commented out).
- Add Elasticsearch data nodes and additional shards.
- Add an autoscale group for future Rancher hosts.
- Troubleshoot the GlusterFS issue/bug/misconfiguration I was experiencing. Persistent Elasticsearch data would be great if I could get it working.
- Improve the volume check logic to verify EACH volume has been created. I cheat and check just one right now.
- Improve JSON parsing. Right now I don’t verify the name of my stack is associated with the environment ID. Since all environment IDs start at “1e1”, I just count from there and hard code it. I should do lookups.
- Add filebeats as a Docker container and collect ALL THE LOGS!
- ADD HEALTHCHECKS TO THE STACKS. Without it, if the host goes down for whatever reason, the host will perpetually be in “reconnecting” and the container on that host will not come back.